Build your custom AI Solution integrating Semantic Kernel into your Azure Container Apps
Welcome to another post from CloudBlogger!
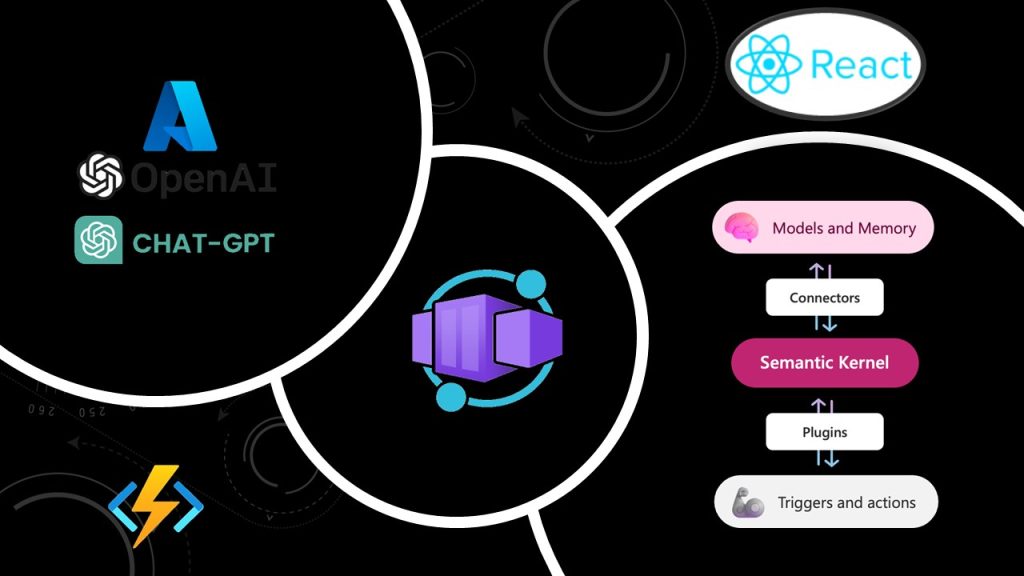
Today we are exploring Semantic Kernel and how we can implement Azure Open AI with total control on the prompts and the requests towards our Chat deployments! Our Project is a Learning Application assisting users into learning different topics with Tutorials and Quizzes fresh from Azure Open AI. The same can be achieved using Open AI Chat GPT, but we love Azure and we are going to use the Azure Open AI resources!
Intro
For our solution we have some prerequisites needed to make it work so lets have a look :
We need an Azure Subscription with Open AI enabled, keep in mind you need to apply via Microsoft Form for Open AI access.
Please make sure you have applied to the Azure OpenAI Service. Once approved for the Azure OpenAI Service, you will have access to GPT-4 in the following regions: – Sweden Central – Canada East – Switzerland North.
Our Workstation should have Docker installed and Azure Functions Core Tools, Azure Account and Python for VSCode. Also Node.Js for our React implementation and testing.
Deployment
Let’s start with a quick Terraform deployment to build our base resources , like a resource group, Azure Container Registry, Application Insights etc. I will provide the main.tf since the rest are quite standard and you can find Terraform instructions from scratch throughout our Blog Site!
# main.tf - Deploy Core Resources and Services on Azure -
# Create Randomness
resource "random_string" "str-name" {
  length  = 5
  upper   = false
  numeric = false
  lower   = true
  special = false
}

# Create a resource group
resource "azurerm_resource_group" "rgdemo" {
  name     = "rg-myapp"
  location = "westeurope"
}

# Create Log Analytics Workspace
resource "azurerm_log_analytics_workspace" "logs" {
  name                = "Logskp"
  location            = azurerm_resource_group.rgdemo.location
  resource_group_name = azurerm_resource_group.rgdemo.name
  sku                 = "PerGB2018"
  retention_in_days   = 30
}

# Create Application Insights
resource "azurerm_application_insights" "appinsights" {
  name                = "appin${random_string.str-name.result}"
  location            = azurerm_resource_group.rgdemo.location
  resource_group_name = azurerm_resource_group.rgdemo.name
  workspace_id        = azurerm_log_analytics_workspace.logs.id
  application_type    = "other"
}

output "instrumentation_key" {
  value     = azurerm_application_insights.appinsights.instrumentation_key
  sensitive = true
}

output "app_id" {
  value     = azurerm_application_insights.appinsights.app_id
  sensitive = true
}

# Create Azure Container Registry
resource "azurerm_container_registry" "acr" {
  name                          = "azr${random_string.str-name.result}"
  resource_group_name           = azurerm_resource_group.rgdemo.name
  location                      = azurerm_resource_group.rgdemo.location
  sku                           = "Premium"
  admin_enabled                 = true
  data_endpoint_enabled         = true
  public_network_access_enabled = true
}

# Create an App Service Plan
resource "azurerm_service_plan" "asp" {
  name                = "asp-${random_string.str-name.result}"
  resource_group_name = azurerm_resource_group.rgdemo.name
  location            = azurerm_resource_group.rgdemo.location
  os_type             = "Linux"
  sku_name            = "B2"
}

# Create a Storage Account
resource "azurerm_storage_account" "storage" {
  name                     = "s${random_string.str-name.result}01"
  resource_group_name      = azurerm_resource_group.rgdemo.name
  location                 = azurerm_resource_group.rgdemo.location
  account_tier             = "Standard"
  account_replication_type = "LRS"
}

# Create a Linux Function App
resource "azurerm_linux_function_app" "pyapp" {
  name                = "py${random_string.str-name.result}"
  resource_group_name = azurerm_resource_group.rgdemo.name
  location            = azurerm_resource_group.rgdemo.location
  service_plan_id     = azurerm_service_plan.asp.id

  storage_account_name       = azurerm_storage_account.storage.name
  storage_account_access_key = azurerm_storage_account.storage.primary_access_key


  app_settings = {
    "WEBSITE_RUN_FROM_PACKAGE"              = "1"
    "APPLICATIONINSIGHTS_CONNECTION_STRING" = azurerm_application_insights.appinsights.connection_string
    "APPINSIGHTS_INSTRUMENTATIONKEY"        = azurerm_application_insights.appinsights.instrumentation_key
  }

  site_config {
    always_on = true
    application_stack {
      python_version = "3.11"
    }
    cors {
      allowed_origins = ["*"]
    }
  }
}
We are getting some traction here, but we are still on Infrastructure deployment, Let’s pick some speed up and start configuring our Docker Images. We need a Docker Image for the React Application and another one for the Python backend, We will use docker-compose so we can test our Frontend and Backend locally before deploying to cloud. I won’t dive into React here but you can find the code in GitHub. So in simple words, create a Folder Structure like this:
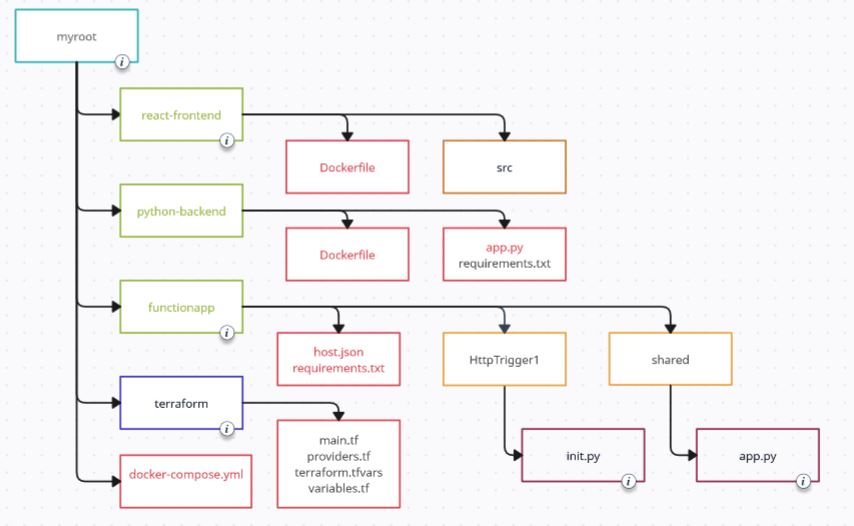
Our respective Dockerfiles :
# Frontend - React
# Build stage
FROM node:18 AS build

# Set the working directory
WORKDIR /app

# Copy the frontend directory contents into the container at /app
COPY . /app

# Copy the environment file
COPY .env /app/.env

# Install dependencies and build the app
RUN npm install
RUN npm run build

# Serve stage
FROM nginx:alpine

# Copy the custom Nginx config into the image
COPY custom_nginx.conf /etc/nginx/conf.d/default.conf

# Copy the build files from the build stage to the Nginx web root directory
COPY --from=build /app/build /usr/share/nginx/html

# Expose port 80 for the app
EXPOSE 80

# Start Nginx
CMD ["nginx", "-g", "daemon off;"]
# Backend - Python
# Use the official Python image as the base image
FROM python:3.11

# Copy the backend directory contents into the container at /app
COPY . /app

# Set the working directory in the container to /app
WORKDIR /app

# Copy the environment file
COPY .env /app/.env

# Install any needed packages specified in requirements.txt
RUN pip install --no-cache-dir -r requirements.txt

# Expose port 5000 for the app
EXPOSE 5000

CMD ["uvicorn", "app:app", "--host", "0.0.0.0", "--port", "5000"]
You can either work as separate Containers or work with Docker and docker-compose:
# Docker Compose both Images
version: '3'
services:
  frontend:
    image: frontend:v10
    build:
      context: .
      dockerfile: Dockerfile

    ports:
      - "80:80"

  backend:
    image: backend:v10
    build:
      context: ../backend
      dockerfile: Dockerfile
    ports:
      - "5000:5000"
    environment:
      - QUART_ENV=development
    command: uvicorn app:app --host 0.0.0.0 --port 5000
Run docker build and docker tag & push commands and verify that your containers are communicating correctly, by running docker-compose up, and docker-compose down to stop the Multi-image container.
Take it to Azure
It is time to move our Project to its final destination, Azure Cloud! Lets start with the HTTP trigger cause we need the URL to enter in the Frontend React App to make the calls. We will use Model V1 as until the time this post is written the V2 is in preview.
In VSCode (or any Editor), following the structure above we need a Trigger to route the payload to our Python App. So here we have our function.json ;
# function.json - HTTP Trigger
{
  "scriptFile": "__init__.py",
  "bindings": [
      {
          "authLevel": "anonymous",
          "type": "httpTrigger",
          "direction": "in",
          "name": "req",
          "methods": ["post"],
          "route": "engage"
      },
      {
          "type": "http",
          "direction": "out",
          "name": "$return"
      }
  ]
}
We need also to modify and tune our init.py, and it is really a display of how flexible and powerful Python is :
# init.py - Send payload to Python App route /engage
import logging
import azure.functions as func
from shared.app import engage_logic
import json
import asyncio

def run_async_function(func_to_run, *args):
    new_loop = asyncio.new_event_loop()
    try:
        asyncio.set_event_loop(new_loop)
        return new_loop.run_until_complete(func_to_run(*args))
    finally:
        new_loop.close()

def main(req: func.HttpRequest) -> func.HttpResponse:
    logging.info('Python HTTP trigger function processed a request.')

    try:
        request_data = req.get_json()
        user_input = request_data['user_input']
    except ValueError:
        return func.HttpResponse("Invalid JSON input", status_code=400)

    # Using the run_async_function to execute the engage_logic function
    answer_text = run_async_function(engage_logic, user_input)

    return func.HttpResponse(json.dumps({"response": answer_text}), status_code=200)
Here, the function run_async_function creates a new event loop and sets it as the current loop for its context. Then, it runs the async function func_to_run with the provided arguments (*args). After it’s done, it closes the loop. Nice !
Don’t forget the requirements.txt in the Function’s root folder and let’s go ! Deploy the new Function to Azure Function Apps :
func azure functionapp publish <FunctionAppName>Make sure the local.settings are uploaded into Azure, or do it by hand! Also available in the relevant Git Hub Repo.
Now we have our Function App ready. Let’s get our URL either from the Portal or from Azure Cli:
az functionapp function show --name xxx--function-name httptrigger1 --resource-group rg-xxx--query invokeUrlTemplate --output tsv
And off to our React App in the .env file ( Avalable in GitHub) to add our Endpoint, rebuild the Image and push it to Azure Container Registry. First things first, we have an .env file that shows to the Frontend where to send the payload once a user makes a request (Hits a link). Here is a sample, where we are entering the Function App URL:
REACT_APP_BACKEND_URL= 'https://xxxxx.azurewebsites.net/api'Next login to Azure Container Registry:
az acr login --name $(az acr list -g rg-myapp --query "[].{name: name}" -o tsv)Build and tag our Image and Push it to ACR :
docker build -t learning-aid-app-frontend:latest .docker tag learning-aid-app-frontend:latest azcont1.azurecr.io/frontend:v10docker push azcont1.azurecr.io/frontend:v10Our Image is uploaded so lets create Azure Container Apps Environment and create our image from the registry:
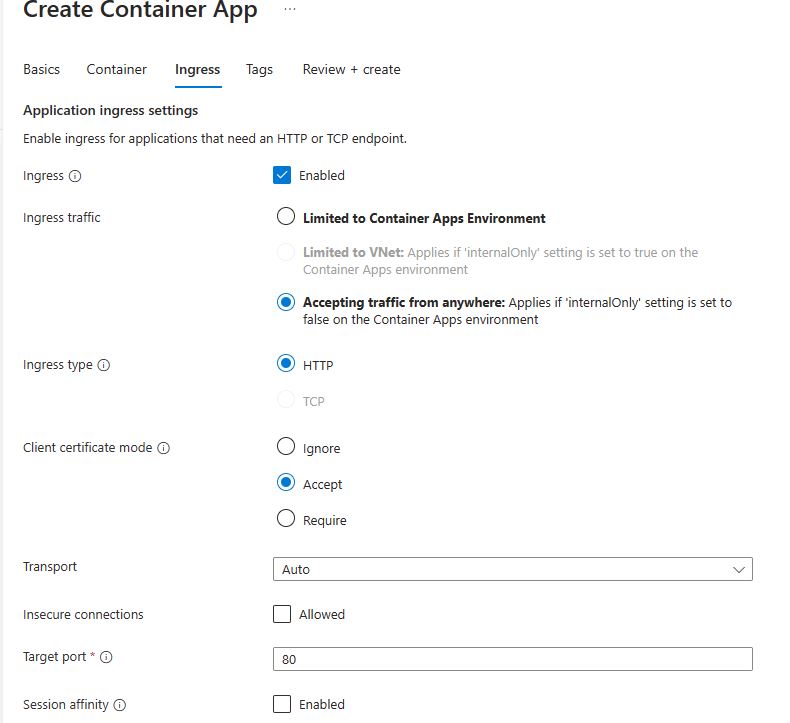
Search for Container Apps and create a new one, with an Environment with Default settings. Pay attention to the Image selection to the newly uploaded one, and create the Ingress as shown :
I suggest you grab a Certificate from Let’s Encrypt or any other and upload it to serve your own domain :
From the Container App – Custom Domains add your Domain and Upload your PFX:
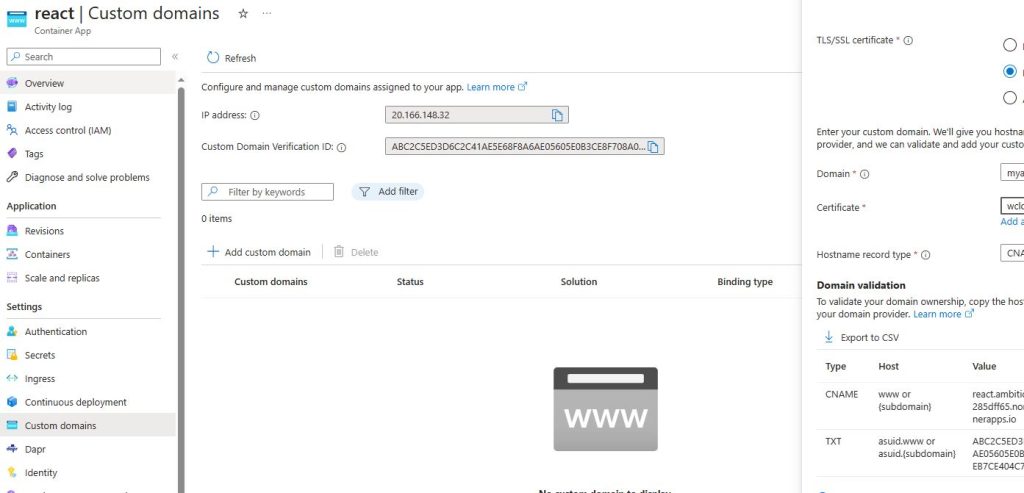
Follow the instructions and you are serving your Domain from this Container App !
Finally we are ready ! Open your URL and hit one of the available links ! We are getting a response from Open AI Chat GPT, in fact we have our prompts pre configured with the Semantic Kernel at hand. The possibilities are numerous !
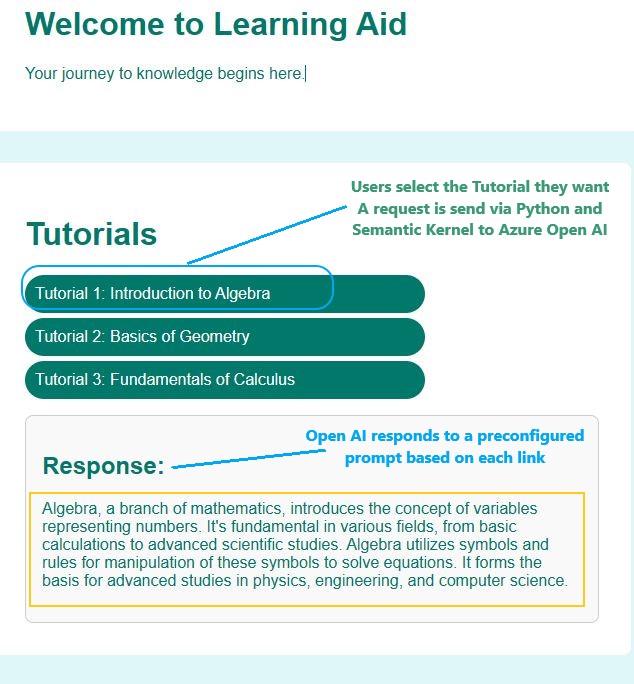
Let’s have a look on the Python code ( Available in Git Hub ) snippet, which shows the connector and the prompt manufacturing ;
kernel = sk.Kernel()
#kernel.add_chat_service(

from semantic_kernel.connectors.ai.open_ai import AzureChatCompletion

#deployment, api_key, endpoint = sk.azure_openai_settings_from_dot_env()


deployment = os.environ.get('AZURE_OPENAI_DEPLOYMENT_NAME')
api_key = os.environ.get('AZURE_OPENAI_API_KEY')
endpoint = os.environ.get('AZURE_OPENAI_ENDPOINT')

kernel.add_chat_service("chat_completion", AzureChatCompletion(deployment, endpoint, api_key))

prompt_config = sk.PromptTemplateConfig.from_completion_parameters(
    max_tokens=6000, temperature=0.7, top_p=0.8
)
prompt_template = sk.ChatPromptTemplate(
    "{{$user_input}}", kernel.prompt_template_engine, prompt_config
)
prompt_template.add_system_message(system_message)

function_config = sk.SemanticFunctionConfig(prompt_config, prompt_template)
chat_function = kernel.register_semantic_function("ChatBot", "Chat", function_config)
The highlighted areas show the interesting parts, where we create the connection and select the flavor of our AI Chat. Also in the React App we add the actual Prompts:
/*function Tutorials() { */
    return (
        <div className="tutorials">
            <h1>Tutorials</h1>
            <ul className="tutorial-list">
                <li>
                    <a
                        href="#tutorial1"
                        className="tutorial-link"
                        onClick={() => handleEngageClick('Write 50 words on Introduction to Algebra')}
It is really amazing ! Integrating AI into our code and choosing what to request with a lot of flexibility. This is a small scale example, really the sky is the limit !
Tuning
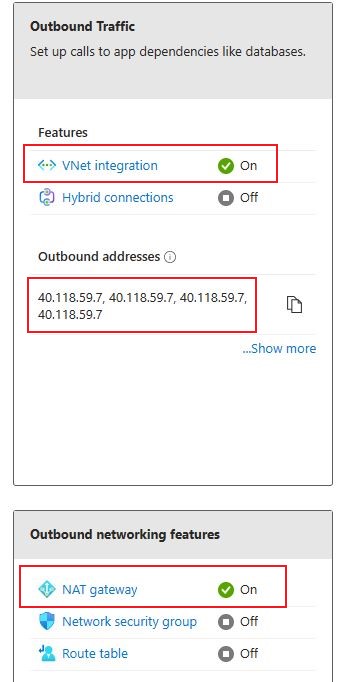
We can expand the Solution to narrow down allowed IPs for Azure Open AI. For example Azure Functions usually have a number of IP Addresses for Outbound communications and we can add these to Azure Open AI Allowed IPs , from the /16 networks. We can also utilize NAT Gateway for Azure Functions and use just one IP Address in our Open AI Network rules.
Conclusion
In wrapping up, our demo really brought to life the magic that happens when you toss Semantic Kernel, Azure Container Apps, and OpenAI into the mix together. Azure Container Apps showed us that managing our app can be a breeze, making sure it stays up and runs smoothly no matter what. On the other hand, diving into the Semantic Kernel was like taking a joy ride through the depths of semantic understanding, making sense of the context way better than before. And of course, bringing OpenAI into the party just took things to a whole new level. It’s like we gave our app a brain boost with the kind of AI smarts that OpenAI brings to the table. It’s pretty exciting to see how blending these tech pieces together in the demo paves the way for some cool, intelligent apps down the line. This combo of tech goodies not only shows off the cool stuff happening in cloud computing and AI, but also gets the wheels turning on what other cool innovations we could whip up next on platforms like Azure.