In today’s environments automation is quite helpful if not mandatory, An IT Team has a lot to deal with, so an automated way to create new users into Azure AD can save a lot of time.
This deployment is done mostly with Azure Pipelines and ARM Templates with some help of Azure CLI and Powershell. We deploy our resources, make configurations and then ….Go! We can import Users from HTML into Cosmos DB with an HTTP Trigger and Azure Functions! Just give them the URL to enter simple details like First Name , Last Name and a nickname and there you go!
Tools
The tools we are using are:
- Azure DevOps Release and Build Pipelines and Azure Repos
- Azure Functions
- Azure CosmosDB ( SQL API )
- Storage Account
- Graph API
- A Static Web APP to host our HTML form
Since the HTML Form is a static Website we are not covering this part. I will provide the HTML code and all you have to do is change the API to call the Function Trigger. We can host this Web Form even into a Storage Account, i am using Static Web Apps since we can make additions later, and expand the Solution from GitHub. You can have a look HERE for the Static Web App deployment with GitHub Actions.
Steps
This is not a small deployment . A lot of parts are integrated so it does matter how to deploy and the steps to make it work. Lets start from the resources we deploy into an Azure Subscription.
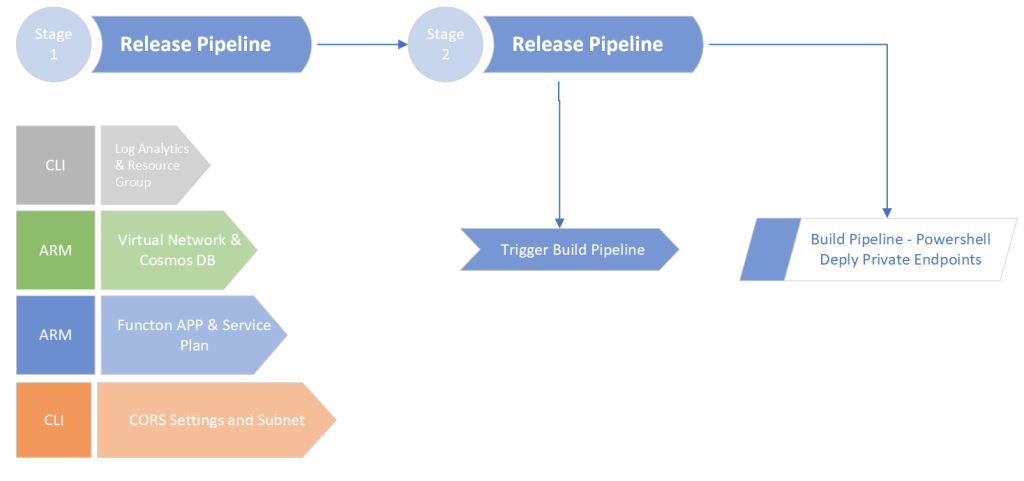
The following release pipeline has 2 Stages. First Stage deploys:
- Task 1 – Our resource group with a Log Analytics Workspace for the Application Insights (AzCli)
- Task 2 – A Virtual Network , the Cosmos DB Account with VNET Integration and Private Endpoint(Arm)
- Task 3 – Cosmos DB Container with Unique ID setting to prevent Duplicate Nickname/Email/UPN(Arm)
- Task 4 – Function App(Arm)
- Task 5 – Function App Subnet and CORS Setting(AzCli)
- Task 6 – Function App VNET Injection(Powershell)
The Second Stage takes us to just a trigger to Start a Build Pipeline that deploys the Private Endpoint and the configuration to integrate it with the Private DNS Zone for CosmosDB. The way i chose to do this step can be done only via Build Pipeline!
Now some details to clarify things. We are using Private Endpoints and Private DNS Zone therefore the VNET Injection setting from Azure Functions is mandatory. We are setting Unique ID for Cosmos DB field (nickname) so even the FirstName , LastName are the same a third field named Nickname will be checked upon and fail the HTML Signup with a message. The Nickname is handy to create a random password or the email and so on. We could use Synapse ( or Data Factory) to export the CSV, but the standard way of Azure Functions with a second Function triggering upon Cosmos DB change, was the final choice. It took me a long time to make the code work i have to admit!
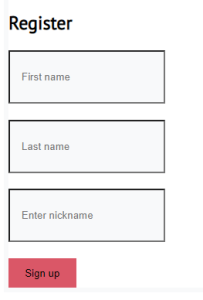
The end user is hitting a URL ( Of course custom domain can be configured, either in Static Apps or Storage Account Static WebSite), and is presented with the HTML Form where inputs First Name , Last Name and Nickname. If there is no duplicate a message is returned “Sign Up Completed” , otherwise (and on any failure) ‘Sign Up Failed”. It is important to set the CORS setting in Azure Functions to * in order to accept data from any URL. The HTML Form is this along with the code:
The following code is the HTML and the style.css i am using, you can customize at will! Pay attention to the URL in bold, this is where you put the Azure Functions URL.
<!DOCTYPE html>
<html>
<head>
    <link rel="stylesheet" type="text/css" href="style.css">
    <style>
      #message {
        margin-top: 20px;
        padding: 10px;
        background-color: lightgray;
        border-radius: 5px;
        text-align: center;
        font-weight: bold;
        display: none;
      }
      /* added CSS */
      .center {
        position: absolute;
        top: 50%;
        left: 50%;
        transform: translate(-50%, -50%);
      }
    </style>
<script>
  function showMessage(response) {
    document.getElementById("message").innerHTML = response;
    document.getElementById("message").style.display = "block";
  }

  function submitForm(e) {
    e.preventDefault();
    var formData = new FormData(e.target);
    var xhr = new XMLHttpRequest();
    xhr.open("POST", e.target.action, true);
    xhr.setRequestHeader("Content-Type", "application/x-www-form-urlencoded");
    xhr.onload = function() {
      if (xhr.status === 200) {
        if (xhr.responseText === "success") {
          showMessage("Sign Up Completed");
        } else {
          showMessage("Sign Up Failed");
        }
      } else {
        showMessage("Sign Up Failed");
      }
    };
    xhr.send(new URLSearchParams(formData).toString());
  }
</script>
</head>
<body>
  <!-- added wrapper div with class 'center' -->
  <div class="center">
    <form method="post" action="https://func-url.azurewebsites.net/api/HttpTrigger?" onsubmit="submitForm(event)">
      <div class="container">
        <div class="row justify-content-center">
          <div class="col-md-5">
            <div class="card">
              <h2 class="card-title text-center">Register</h2>
              <div class="body">
                <div class="form-group">
                  <input type="text" class="form-control" id="firstName" name="firstName" placeholder="First name" required>
                </div>
                <div class="form-group">
                  <input type="text" class="form-control" id="lastName" name="lastName" placeholder="Last name" required>
                </div>
                <div class="form-group">
                  <input type="text" class="form-control" id="nickname" name="nickname" placeholder="Enter nickname" required>
                </div>
                <div class="d-flex flex-row align-items-center justify-content-between">
                  <button type="submit" class="btn btn-primary btn-block">Sign up</button>
                </div>
              </div>
            </div>
          </div>
        </div>
      </div>
    </form>
    <div id="message"></div>
  </div>
</body>
</html>
@import url('https://fonts.googleapis.com/css?family=PT+Sans');

body{
  background: #fff;
  font-family: 'PT Sans', sans-serif;
}
h2{
  padding-top: 1.5rem;
}
a{
  color: #333;
}
a:hover{
  color: #da5767;
  text-decoration: none;
}
.card{
  border: 0.40rem solid #f8f9fa;
  top: 10%;
}
.form-control{
  background-color: #f8f9fa;
  padding: 20px;
  padding: 25px 15px;
  margin-bottom: 1.3rem;
}

.form-control:focus {

    color: #000000;
    background-color: #ffffff;
    border: 3px solid #da5767;
    outline: 0;
    box-shadow: none;

}

.btn{
  padding: 0.6rem 1.2rem;
  background: #da5767;
  border: 2px solid #da5767;
}
.btn-primary:hover {


    background-color: #df8c96;
    border-color: #df8c96;
  transition: .3s;

}
DevOps Pipelines
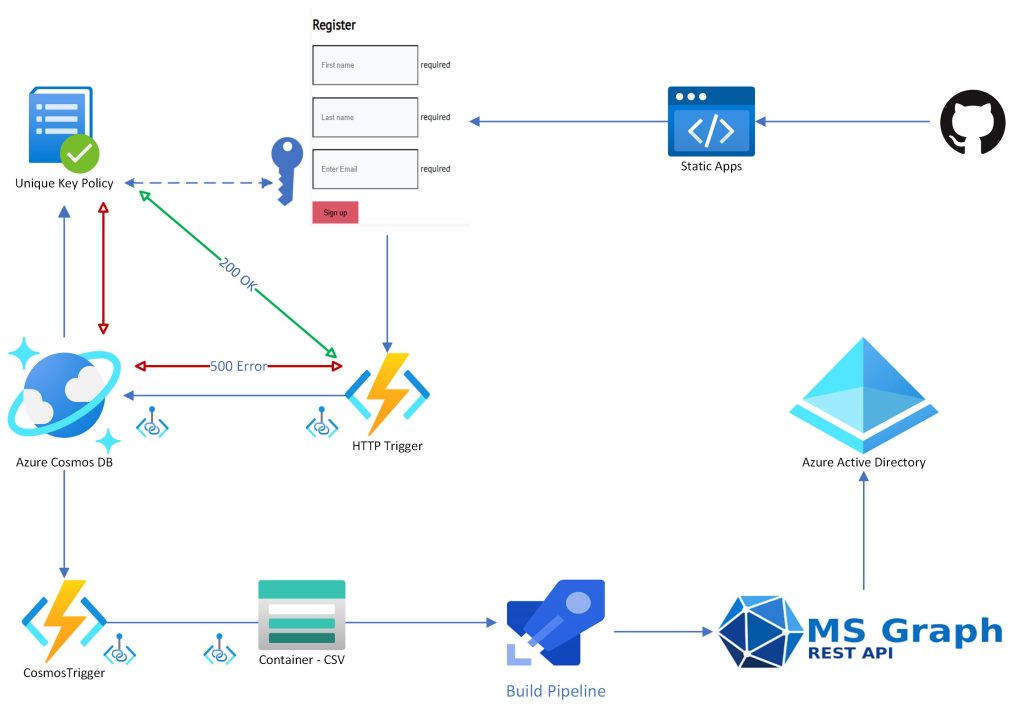
As we already know, our deployment is utilizing DevOps Pipelines for most of the Resources. We are building with release pipelines and triggering a build pipeline in the final stage.
The same logic is firing the Functions Apps. Once the HTTP trigger is completed and the values are inserted into Cosmos DB we have our User details transformed to CSV and uploaded to a Storage Blob.
A Build pipeline makes the final step to import our users into Azure AD with a random password. We can expand to many applications this Solution, but when it comes to users lets keep it simple. Just a First Name a Last Name and the nickname. Later on maybe we add Email verification for example!
So the whole solution is going to be published on GitHub and i will break down the directories for easier implementation with instructions as well. Lets have a look to our Architecture :
For the impatient, the important parts of the two Azure Functions are following :
Function No1 – The HTTP Trigger ( Import Data via HTML to Cosmos DB)
#r "Newtonsoft.Json"

using System.Net;
using Microsoft.AspNetCore.Mvc;
using Microsoft.Extensions.Primitives;
using Newtonsoft.Json;
using Microsoft.Azure.WebJobs;

public static async Task<IActionResult> Run(HttpRequest req, ILogger log, IAsyncCollector<dynamic> outputDocuments)
{
    var requestUtc = DateTime.UtcNow;

    string requestBody = null;
    using (var bodyReader = new StreamReader(req.Body))
    {
        requestBody = await bodyReader.ReadToEndAsync();
    }

    log.LogInformation($"Request body: {requestBody}");

    var formValues = System.Web.HttpUtility.ParseQueryString(requestBody);

    var password = GeneratePassword();

    var outputDocument = new
    {
        requestUtc,
        Company = "Azure",
        firstName = formValues["firstName"],
        lastName = formValues["lastName"],
        nickname = formValues["nickname"],
        password = password
    };

    await outputDocuments.AddAsync(outputDocument);

    return new ContentResult
    {
        Content = "success",
        ContentType = "text/plain",
        StatusCode = (int)HttpStatusCode.OK
    };
}

public static string GeneratePassword()
{
    var chars = "ABCDEFGHIJKLMNOPQRSTUVWXYZabcdefghijklmnopqrstuvwxyz0123456789";
    var random = new Random();
    var password = new string(
        Enumerable.Repeat(chars, 6)
                  .Select(s => s[random.Next(s.Length)])
                  .ToArray());

    return "my1P@" + password;
}
Function No2 – The CosmosDB Trigger (Move Data to Storage Blob in CSV format)
This was SO hard to figure out. It is a local Deployment that gets published to Azure Functions.
const { BlobServiceClient } = require("@azure/storage-blob");
const { DefaultAzureCredential } = require("@azure/identity");
const stream = require("stream");
const csv = require("csv-parser");
const moment = require("moment");
const accountName = "xxxStorageAccxxx";
const containerName = process.env.BlobContainerName;

module.exports = async function (context, documents) {
    context.log(`Cosmos DB trigger function processed ${documents.length} documents`);

    // Create a BlobServiceClient object which will be used to create a container client
    const defaultAzureCredential = new DefaultAzureCredential({
        additionallyAllowedTenants: ["*"]
        });
    const blobServiceClient = new BlobServiceClient(
        `https://${accountName}.blob.core.windows.net/csv/`,
        defaultAzureCredential);

    // Get a reference to a container
    const containerClient = blobServiceClient.getContainerClient(process.env.BlobContainerName);

    // Create a new blob name
    //const directoryName = "addata";
    const blobName = 'data/users.csv';


 // Check if the file already exists in the container
    const blobClient = containerClient.getBlockBlobClient(blobName);
    const exists = await blobClient.exists();
    let csvData = '';
    if (exists) {
        // If the file exists, download it and append new values
        const downloadResponse = await blobClient.download();
        const existingCsvData = await streamToString(downloadResponse.readableStreamBody);
        csvData = existingCsvData.trim() + '\n';
    } else {
        // If the file does not exist, add the column headers
        csvData = 'id,firstName,lastName,nickname,password\n';
    }

    // Parse the input documents and append them to the CSV data
    for (const document of documents) {
        const csvRow = {
            'id': document.id,
            'firstName': document.firstName,
            'lastName': document.lastName,
            'nickname': document.nickname,
            'password': document.password
        };
        const values = Object.values(csvRow).join(',');
        csvData += values + '\n';
    }

    // Upload the CSV data to a Storage Blob
    const uploadOptions = { blobHTTPHeaders: { blobContentType: 'text/csv' } };
    await blobClient.upload(csvData, csvData.length, uploadOptions);

    context.log(`Uploaded CSV data to blob: ${blobName}`);
};

// Helper function to convert a ReadableStream to a string
async function streamToString(readableStream) {
    return new Promise((resolve, reject) => {
        const chunks = [];
        readableStream.on("data", (data) => {
            chunks.push(data.toString());
        });
        readableStream.on("end", () => {
            resolve(chunks.join(""));
        });
        readableStream.on("error", reject);
    });
}
Function No3 – Trigger upon CSV creation the Build Pipeline
const axios = require('axios');

module.exports = async function (context, myBlob) {
    //const PAT = process.env.PersonalAccessToken; // Replace with your Azure DevOps personal access token
    const ORGANIZATION_URL = process.env.AzureDevOpsCollectionURL; // Replace with your Azure DevOps organization URL
    const PROJECT_NAME = process.env.ProjectName; // Replace with your Azure DevOps project name
    const PIPELINE_ID = process.env.definitionId; // Replace with your Azure DevOps build pipeline ID

    const buildUrl = `${ORGANIZATION_URL}/${PROJECT_NAME}/_apis/build/builds?api-version=7.1-preview.7`;

    const requestBody = {
        definition: { id: PIPELINE_ID }
    };
    var axios = require('axios');
    var data = JSON.stringify({
      "definition": {
        "id": 10
      }
    });
    const config = {
      method: 'post',
      maxBodyLength: Infinity,
        url: 'https://dev.azure.com/xxxx/xxxxxxxx/_apis/build/builds?api-version=7.1-preview.7',
        headers: {
          'Content-Type': 'application/json',
          'Authorization': 'Basic xxxxxxxxxxxxxxxxxxxxxxxxxxxxxxxxxxxxxxx',
        },
        data : data
      };
      axios(config)
      .then(function (response) {
        console.log(JSON.stringify(response.data));
      })
      .catch(function (error) {
        console.log(error);
      });
    try {
        const response = await axios.post(buildUrl, requestBody, config);
        context.log(`Build queued with ID: ${response.data.id}`);
    } catch (error) {
        context.log(`Failed to queue build: ${error.message}`);
    }
};
I have not posted the binding files but i guess these are the obvious and easy ones. What i am going to post is the way to make the 2nd function Authenticate. First of all use a Service principal. Just go for SP and do not bother to use Managed Identity here. Second and the most important:
Add Storage Account Active Directory permissions to the SP ( via Application Registrations – API Permissions), otherwise you will hit a wall! (Thankfully Application Insights did a good job, along with Google!), The permissions are user.impersonation, and it is the solution to the Authentication errors someone may see and wondering what is going on!
I will update Following, the post where to find the Deployment Pipelines and Scripts in GitHub:
Update : https://github.com/passadis/CosmosDB-ADUsers
Before closing i have to give credit to Sean McAvinue for the script that imports users to AAD via Ms Graph.